Translate

Wednesday, October 30, 2013

Getting that Digital IR Look

Save that Image?

Don't hit DELETE just yet, TRY this out first

Today I'll attempt to save one image that normally would have been deleted, and I'll take another image to a entirely different level. How? By giving each image an IR look without the use of expensive film or equipment. I'll be using Tone Curves strait out of the camera, skipping Lightroom & Photoshop all together, save time: I'll be on my way.

I use this for an image that I either don't like or really like, mainly landscape images and almost entirely outdoors. The sun needs to be bright so that it blows out the highlights. An inferred filter can be quite costly, and removing the IR filter on your digital camera will cost about $200us. 

I've chosen two photo's a Color image and a B&W. Let's look at the B&W first.

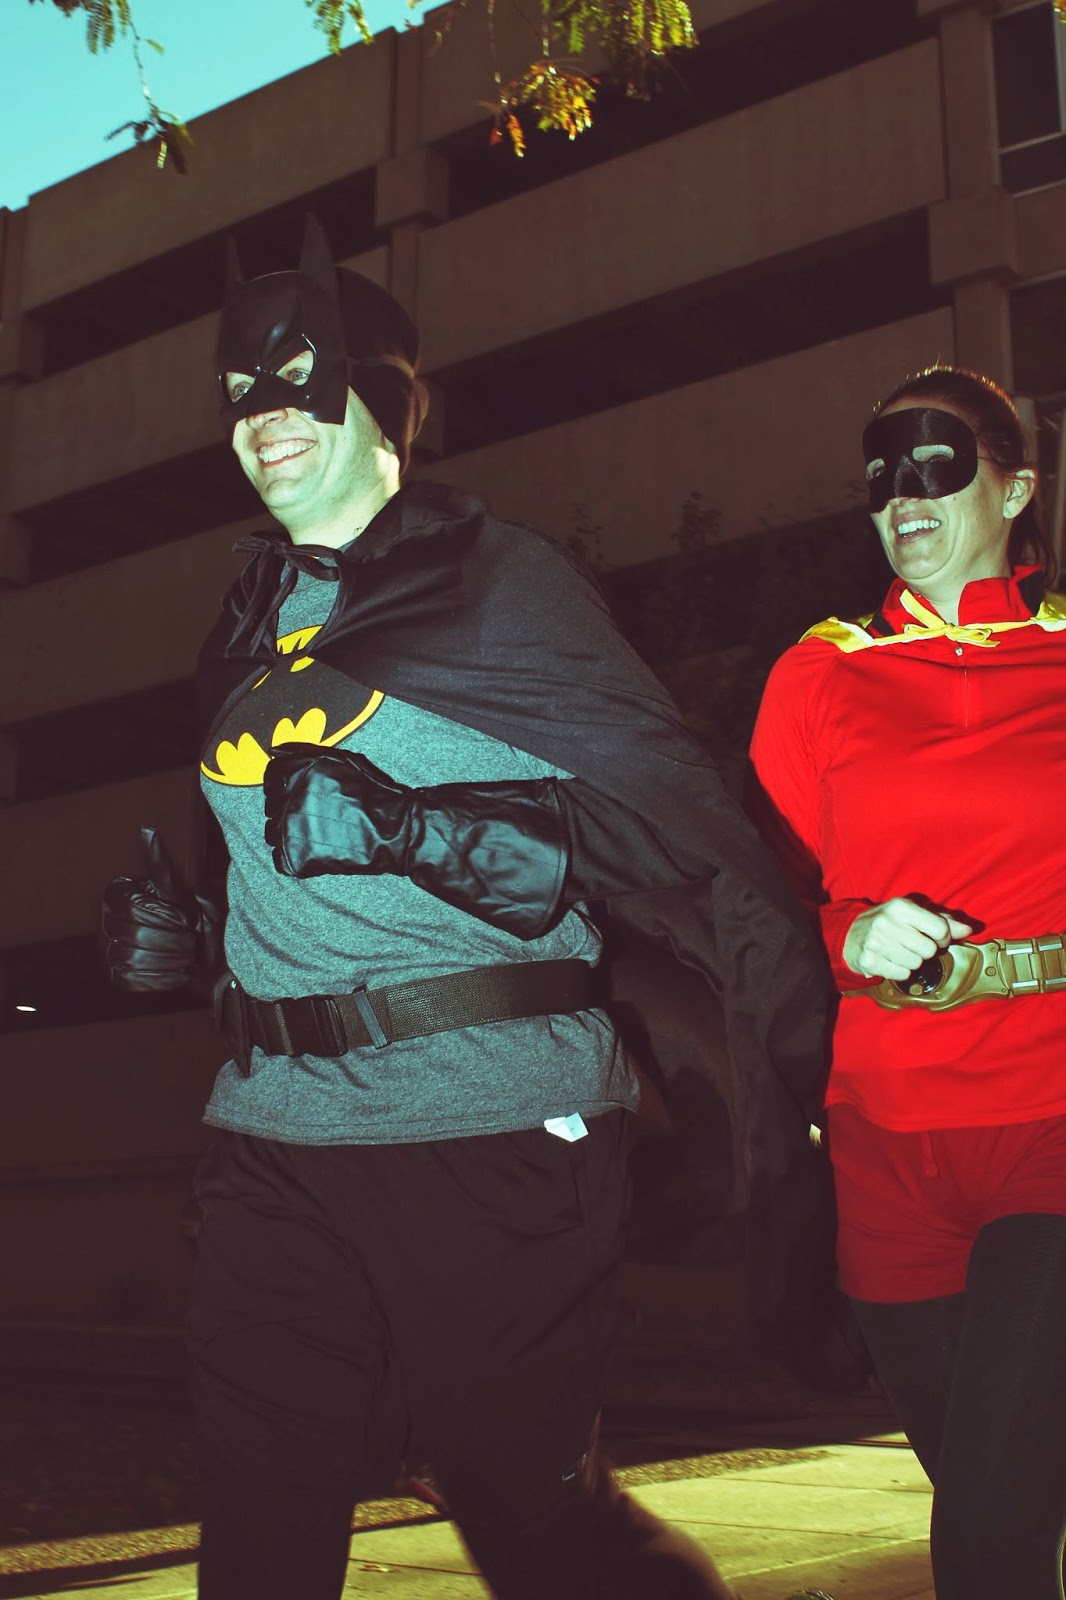
The Running Nun (that was not intended to be a play on words)

This image was photographed in B&W with a custom WB. It's important when attempting to do this that a custom WB is used, but not necessary. To get a custom WB you need to point your camera at the ground, with the sun shining, preferably on grass and with the sun shining. 

Now that I've set my custom WB, I just went ahead and took the image like normal, sometimes if I'm going to create an IR image then I will purposely over expose the image. Here's the before and after image.


Well I'm not going to win any awards, this certainly isn't going to bring me any cash either. I didn't even choose to display this image in my Google+ Albums. That is an entirely different edit, and quite a better one too! Check that out here Cross Process Nun It's fun and gives the image an interesting and contrasty look and feel, it impresses friends and family and after a while I end up keeping several images that otherwise just wouldn't cut it. 

Here's how I did it... Tone Curves


Normally I tend to put a slight S curve into my Luminance Curve, however her I placed one dot in the middle as an anchor point, turns out I didn't even need it. In the Red curve I did however add a little to the highlights in the B&W image.  And I used the green to pull a little out of the highlights and increase in the shadows. Notice in the Blue Curve how it just begins to start clipping, I've found that either the blue or red curve will just begin to clip but I keep it backed off from this point, however I do not want both to reach that point in the image. 


Now let's take a look at the colored image conversion...

Here's the before and after


The thing that really bugs me about this image is the overcast sky, winter's in Iowa... I'd preferred to have had a really contrasty sky but I don't want to pass up those fall colors. I really like the interesting sky in the first photo. 

Here's a Tip: try shooting with a high ISO 400-800 to add texture to the image!


Here are the four tone curves, split up like in the first image, notice how the red and blue just about stay the same it's the green curve that changed but notice how I changed it I took it in one arking loop, soft and gradual. Make sure you write down the slider setting also, 3 out of the 4 had tweaks made to them. 


Keep shooting and good luck!


Here are some more images that I played with.

Original B&W high ISO 

Original Color

Original B&W scanned from film


Monday, October 28, 2013

Outdoor Lighting Tip

Shooting into the Sun can be Fun


This past Saturday I had the opportunity to do some street shooting, albeit a different kind. So I took up the challenge packed light and headed downtown for the Newbo Chicken Run a 5K costume race. 


The Gear

Since I knew I'd be walking a lot, I needed to take minimal gear so I choose my camera, two lenses a 28mm f/2.8 and the 18-55 which I didn't use. I also had my Speedlite and 3ft. sync cord, with a gel on the flash. The gear I choose was dictated by the shot that I wanted to get.

I knew already that I wanted to shoot into the sun. There were several factors that led to this decision, the time of day for one; it was around 4 o'clock p.m., so I knew that the sun would still be a bit harsh yet, I had it right where I wanted it.


The Problem/Solution

I obtained a course map and then printed a more detailed map from Google marked with Landmarks and other interesting areas of the route that I felt would provide me with interesting background material or image subject matter. I took both of those marked up maps with me but not before I had picked a couple of spots to photograph from forehand. In a short 5 kilometer race like this one I would only have one or two locations to photograph the runners. Determining that I wanted a shot into the sun helped to eliminate areas that I didn't want. Next I had to choose between area's of the race course that where close together and Landmarks that I wanted. 

A race like this with so many persons and all dressed in costumes excited me, I knew that I didn't know what I'd be getting, even more so I liked the fact that it all wouldn't be the same. However that also increased my opportunity to miss the shot, with so many different characters who knew what I'd be getting and how long would I have to wait in one position before I could move to the next?

Here's The Shot_ One of Em'

You can find more from the album on Google plus here Chicken Run Photo's 

 Image 1
same as last Image 5 but with flash turned on blue gel removed from the flash

How I made the Image


First things First

I not only wanted to photograph into the sun I also wanted images that looked discolored, but I wanted to do this in camera not afterwards. I wouldn't be shooting in RAW and I would be using medium Jpeg files because these images were just for fun and wouldn't be leaving the web. 

Beside all that I have been experimenting with in camera ways to create digital Lomo and XProcessed or Polaroid type images. At lease things similar. 


WB +/- Shift Bracketing

In Canon camera I used a custom WB setting which I had preset the day before, adjusting this from a sepia photo which had the WB off because I photographed an image using the "wrong" or incorrect WB. Then in the menu setting   WB +/- Shift Bracketing I moved the correction settings around to give me a more blue and magenta color. All this was saved and shot from one of the camera's presets menu.


Flash n'things

The in camera settings gave me the images I've posted below; I covered my flash with a blue gel, it turned out to be to much blue so I decreased my flash to 1/4 power and that helped but then for a different effect I changed the custom bracketing back to normal, then I ended up taking the blue gel off the flash entirely. With each new location I went to the setting change so my camera settings changed also, for the image above I incresed the flash power to full. I knew how entirly important it would be to use as much flash power as I could get shooting into the sun.


 You can find more from the album on Google plus here Chicken Run Photo's 

Image 2
test shot, bluish setting withing the camera


 Image 3
adjusted image with blue gel on flash at 1/4 power

 Image 4
custom bracketing off, custom WB on with "incorrect" WB and blue gell still on flash 

Image 5
No flash, as you can see from this image here flash is very important when facing the sun 


So why bother, when there is photo shop, etc...

I've learned to live by those words of Frank Doorhof "why fake it when you can create it?" My chooise to create in camera permited me to save so much time. The only adjustment was made to the tone curves as I downloaded the images. No need to spend the time in photoshop or lightroom, the images where up on the web shortly after I finshed capturing them.

Learn to use your equiptment better, you'll be a better photographer with the confidence to boot. There is nothing worse than as a photographer finding myself in a situation where I don't know what to do, I find that the more I try different things the more confidence I have down the road in those tight situations.


You can find more from the album on Google plus here Chicken Run Photo's 

Wednesday, October 23, 2013

Shoot the Snoot, Advanced Techniques

Diffused, White, Black and Confused?


Just because we have the gear and spent our valuable dollars on it, doesn't mean we'll get the shot let alone know what to do with it.

In this Post I talk about how to use a snoot and look at the few albeit simple differences the slightest changes can make.

The first three images below produce dramatically different results, leaving the camera settings the same, the distance from the light source doesn't change either (about 5' from the end of the snoot). As with all the images from this post the only change was the way I used my snoot. And I'm about to share them with you.

The Top image has been made with a white snoot, typical results nothing to fancy, sure can tell they are fake silk flowers. I choose flowers for this example because of the many colors and edges in the image lots of contrasted areas between the highlights and shadows.

For the Middle image I used a diffused snoot. No, I've not placed a diffuser between the flash and the subject material, what is it then? 

I've made a snoot out of diffuser material, some of the light travels through the snoot but most of it gets diffused through the sides of the snoot and now become a little late and softer getting there, now I've begun to produce a more interesting look.


Top 


Remember you're not putting a diffuser over the flash or between the snoot and the subject, the end of the snoot stays open just as if you are using it normally.


 Middle


Now for a more extreme quality to my image. I've used a fully black snoot.

Take the Rogue Flashbender for example, its white on one side and black on the other, try using the black side for the inside of the snoot. It produces more contrasty image quality. Now I've got a much more interesting image, even for fake silk flowers, this end result is dramatic and fun. I've still got one more tip so keep reading. 

 Lower


Difference Between the Black and White snoot, zoomed slightly out.


A snoot is just a easier and much cheaper way to create a spotlight drama that you can get from stage lights and barn doors, it will be a great way to take photo's of the kiddos during halloween, and it doesn't have to be night out side either these where taken at about 2 o'clock in the afternoon right next to a window. 


Black

White


One last Tip for the Snoot Shoot!


I choose this clock for subject matter but I could have just used a plane backdrop, all I did with the snoot here is pinch the end a little and got this wonderful teardrop quality falloff from the light. Remember it's important to have the light coming from the same side as the pinched edge of the snoot. Here the light is just over my right shoulder and about 8' from the clock. 

Keep practicing and Happy Shooting. I look forward to seeing some of the interesting images you can create, feel free to share your results and post them in the comments below.  

Monday, October 21, 2013

Turn Your Screen Into A Beauty Dish

Below I've posted nine panels as .jpg images that can be used to display as a light source directly from a computer monitor or screen in a 16:9 Ratio. It's possible to create different shapes in the eye's of the subject your photographing.

To download just click on the image and save as...

For easy use just place in a folder and open full screen using the arrow keys to move between images.

Tips on Using a Screen display as your Lighting Source:

1.  Make sure you turn up the Backlight to full power.
2.  Place the display on a cool white, this maximises your lighting strength. 
3.  Keep in mind there will be a quick falloff from this type of power source onto the subject your lighting, so you will need to have your subject's face close to the display.
4.  Because of the type of light make sure the makeup is intense(includes fingernail polish eye shadow, lipstick), and the rest of the face is covered very well as this sort of light can be very harsh on the skin depending on your Backlight type, i.e., fluorescent, LED...
5.  Turn the display on it's end, (I use a 32" INSIGNIA HDTV and turn upright to light the entire head and shoulders evenly)
6.  Use a small piece of white foam core as a reflector next to the screen, like a V-flat.
7.  Finally, any ambient light will overpower the light which comes from your screen, keep that off or to a minimum, this includes flash it can disrupt the pattern in the eyes.   


Have fun and be Creative! Share with us your results, post them here and as always Happy Shooting!


Also if you haven't check this out yet here is the link below!

Free till Oct. 31st DxO Film Pack 3


Thursday, October 17, 2013

Ditch the Mac, LR5 on a PC


Running Windows 8 on a PC and photo editing with PS, Lightroom 5, plugins and other stand alone editing software programs. Details of My secret workaround.


I choose windows 8 for an OS earlier this year; I had an opportunity to get Win8 Pro for $49 as part of the promotional package Microsoft offered. I’ve not been a fan of the windows platform since about Win98 introduction when at that point it has only been three years since the introduction of 95.

So maybe I refer to this somewhat begrudgingly, as I recall the avid and massive ad campaign those wonderful folks over at Microsoft went on to tell us all why we needed to update our PC’s. I’ve said enough about that. There track record speaks for itself.

Whether or not this was a mistake by Mr. Gates’, it’s my opinion that it’s also this blunder that allowed the Mac to have its’ resurgence.

How I got to this Point

Mostly curiosity. I became intrigued with the re-engineering of the Win OS platform, and I’m looking forward to the future. Competition breeds excellence. Or death… ummm.

Highly doubted this possibility turning out as swell as it has. I Use Manga Studio 5 with my Wacom Tablet, the Intuos 5, and now LR 5. It works brilliantly thus far. But I have a secret to why this works and how I made this possible which is the reason I am writing on this topic.

The Rest of the Story

I’m doing all of this on a PC from 2005 which originally ran windows XP before the services pack came out. The processor is an AMD 64 Athlon x2, I was able to get this PC from work for free, completely clean with the XP service pack 3 pro edition installed. And less than 1GB RAM.

I found this the perfect opportunity to play with an Idea I got from Sony. Ready to release the PS4 gaming console it has been almost 17 years since the PSone hit the market. Sony promised us all that they would allow for one generation of console to have a ten year life cycle. And they’ve stuck to that.

My theory came from the thought that if it’s possible to create a gaming console with this life projection then why not my image editing PC?

So Why Not?

Rebuild. And it works; I had a great motherboard (which is a must have), with lots of space to grow. I added a sound card, Graphics Card, new larger hard drives, more RAM and a new power pack.

Including the OS less than $600 spent. This gives me way more opportunity to spend my dollars on the things that I want, bigger Wacom Tablet for instance. While a lot of people are out there spending money on their Mac’s, probably using a credit card and making monthly payments. I’m enjoying the fruits of my labor; 

I run an HDMI cord from the Graphics card to a 32” LED HDTV by INSIGNIA, not a computer monitor. Editing a photo or creating a painting is made a whole lot better because it is easier and faster. Price for this was around $220. Which is about the price of the cheaper PC monitors at around 24” and they’ll not have the color quality that a TV will.  

I did it So can YOU

Two more years is all I need out of this PC, I’ll be doing my next build from the ground up, I’ve already got my APU an AMD A6, I plan on using SSD’s and running with 32GB RAM and with the new Creative Cloud from Adobe. I think many more years for less happens to be in my future, now that’s a bargain. 

Monday, October 14, 2013

Julieanne Kost on cL Talks Lightroom 5

Take Notice

2-day workshop with Julieanne Kost the Principal Digital Imaging Evangelist for Photoshop and Lightroom at Adobe can still be purchases at a discount price for just a few more hours. I posted the link below in Lose Notes and Things.

Okay, I was really able to learn a lot, I'm new to Lightroom not just the fifth installment released earlier in 2013. It was just a few weeks ago that I first learned about Julianne from a training course she did with Scott Kelby at B&H Photo in NY. In this project she was just doing some simple edits within LR5. Which helped tremendously, for a first timer anyway. 

The biggest help came from Julianne's blog Julieanne's Blog_LR5 but even here I was very easily overwhelmed as you could imagine not having any previous experience with LR I diffidently didn't know where to start. This workshop helped so much in giving me a place to start. In effect it will be a great road map as I traverse through the LR and digital software world.

Julieanne is such a wonderful teacher, she has no alternative agenda's, Adobe pays her to do what she does, and she is GREAT at what she does! Adobe is blessed to have her, they are such a awesome company, kudos to Adobe.


What I Think I Think

A few things I learned this weekend, here's my top 5:

5) Split Tone on B&W_ place the balance on +75 place the shadow saturation @ 60 and the highlights around 45_this works well when adding color to the highlights and shadows

4) Split Tone _Sepia Tone is in the Darks_this is the way it used to be done in the darkroom by exsposure to the visible light 
Antique look is in the paper or comes from the Lights(not the light bulb) 

3) Cross Processing _come when color is placed in the Highlights & Shadows in LR5

2) Tone Curve [without a diagram, it would be impossible to explain] _but I had been afraid of this area, she really helped give me confidence to play with this very useful tool

1) HSL _the paint in color trick was AWESOME, sooooo simple too!

Worth all my time, and it will be worth yours too!

Lose Notes and Things

Here is the link to purchase this course for $59 cL with Julianne Kost discount price till 12 noon ET after that it will be $79.

A big thank you to Creative Live for the effort they put into the production process to make this happen. So hats off to them. You can link to them here Creative Live for the rebroadcast during the week. If you have time this really helps because it is condensed and edited not the 14 hours over two days that I participated in.

Also Julieanne has several presets for PS and LR on her blog Julieanne's Presets but they are not all in one place you have to scroll down through the different videos they are in links to .zip files. 

If you missed the workshop or didn't catch the rebrodcast, check back here I will continue to post more notes from the workshop. If there's something you want me to blog about let me know, I'll be happy to help!


Friday, October 11, 2013

Free Filmpack by Dxo Labs!!!

DxO filmpack 3 Free till Oct 31st

Just wanted to remind those who are interested, that the DxO filmpack 3 is currently free until the end of the month.

It is a conversion emulation software that simulates the film look. Great way to add POP to all your photo's.

I'll post a before and after photo below. Anyone can use it, it's FREE and very easy to use, don't let the big words scare you. I've taken advantage of this offer and Love it!

Before Conversion


 ...Beautiful and Notable Difference...


Seriously this is great stuff! It's so easy to use.

Digital Imaging (Part V)

The Digital Lightroom (Part 2b)


Lightroom 5, the new darkroom created for the Photographer. I’ve been hyping Ansell Adams photography for a couple of days now so let’s get strait to his images. Below.


What Ansell Adams was able to accomplish will most certainly never be reproduced, nor in my opinion will anyone even come close. His skill behind the camera was just as good as his talent in the darkroom, terms such as dodging and burning may be gone forever but we can still achieve those same results with the digital tools of today, gone is the darkroom, and in with Lightroom.

Lightroom varies in that of what Photoshop can do. It sets it's self apart from the field by bringing a shear commitment to the digital image, it's ability to allow me as a image maker to stay true to what I want to accomplish by staying true to the image I set out to capture in camera. No tricks, no gadgets just think of it as digital chemicals. 

While not the quality subject matter that Ansell has shot over his lifetime, here are a few images that I have achieved with the use of the digital Lightroom. Employing the same techniques Ansell and other great photographers of days past use; I am able to achieve similar results. Some of these are digital from the start and some have been scanned into the digital realm from their original 35mm full frame films. Can YOU tell which ones!


As you can see employing the use of Lightroom is a necessary tool in the digital Photographers handbag. 
Just remember that no software program fixes bad composition in photography! Enjoy your weekend and Happy Shooting!