Well, the end of another year is upon us. What an excellent year 2013 has been for us. I want to thank everyone who has contributed in any way to the success of my blog and further advancement in my photography. We're always learning. I'm grateful for each and everyone who has read, shared, commented, guided and critiqued along the way.
This blog has been both an experiment and experience. I'm going to step away from blogging for a few months and write a book, which has nothing to do with Photography or blogging. But it'll need my full devote attention in which I fully intend to do so. Thank you for being in my circle and before you decide to remove me. I'll be back, and when I am it'll be bigger and better than ever. Keep me around and always remember, Happy shooting!
Monday, December 23, 2013
Friday, November 29, 2013
Great American Classic: Turkey Bowl '13
9TH Annual Turkey Bowl Leaves Us Hungry For More
Commodores score on fourth and goal to hold off Renegade Comeback; Win 28-21
 Next year will mark the tenth anniversary of the Turkey Bowl, a newer Thanksgiving Day tradition that is finding it's way into the places of the Classic American Holiday for those in the Cedar Rapids, Iowa Metro Area. A flag football game that starts earlier in the day at just after 9 o'clock A.M. has the makings of something special and popular with the whole family. Dad and kids are getting out of the house to leave Mom and the ladies a chance to stay home and soak up the early morning holiday conversation, watch the parades and get things started in the kitchen without interruptions from the family. Of course, Dad says that's his excuse to play in the game and this year's game is sure to be looked upon for years to come as one of the greats as the Renegade took on the Commodores, a match which ended in a shootout with 35 points scored in the final minutes of the contest.
The Commodores never trailed, but had to sweat a little as their opponent managed to keep it close down to the last seconds when the Renegade Offense failed get the ball snapped on a fourth down play as time expired, giving the victory and bragging rights that come with a win.Each side played with heart and grit and it showed as bloody faces and beards ruled the day.
Here are a look at team photos, not all players are present.
.jpg)
.jpg)
The game started with a Renegade possession that saw more yards loss than gain and a turnover on downs on their own side of the field.
On the second play from scrimmage, after a loss on the fist, the Commodore's Gunner, Ken Koske scrambled from the pocket and found himself in the end zone after a brilliant run from midfield for the first points in the game. Score Commodores 7, Renegade 0.
The second possession for the Renegade started inside it's own 10 yard line after a bumbled ball on the kick return. The Commodore Defensive line was working hard to establish the line of scrimmage, first and second down for the Renegade both ended in negative yardage plays. Even causing some controversy over a potential safety on second down, the original call on the field was overruled but the Renegade however found the ball placement about an inch from it's own goal line. It was three plays into the drive before any positive yardage was gained by the Renegade offence. Despite the positive yardage on this drive the offense still failed to convert a first down.
After two miserable drive attempts by the Renegade now it would be the Commodores who failed to move the ball and once the Renegade got the ball back they decided it was time to make a quarterback change. Thomas Osterkamp replaced Garrett Olson and it seemed to be the right choice as the Renegade was able to convert a first down with three running plays from Osterkamp.
Still unable to stop the pass rush by the quicker and smaller Defense, the Renegade decided it was time to use a little trickery. Someone forgot to tell the offense trick plays aren't suppose to be so obvious to the opposing teams Defense. This was the case as a reverse screen pass by Osterkamp to Olson was broken up by Ryan Koske. On the pitch back from Olson, Koske leaped to snap the ball from mid-air, returning the interception for an uncontested touchdown, a play that would end up resulting in his receiving the player of the game and the Gobbler Award. Score Commodores 14 - Renegade 0.

Things went back and forth for awhile and neither team could seem to find the ability to move the ball beyond a couple of first downs. Both Defenses had found groves and the fast paced start had slowed to a bloody back and forth contest. The game began to look more like a Rugby match then a flag football game. Pride was in play for everyone.
Time was running out and just 30 minuets remained in the contest, which operates from a running clock. Renegade had the ball and begun to put together a convincing drive that included a penalty resulting in a first and goal, two running plays later the offense registered it's first touchdown of the game as the Offensive line took control of the line of scrimmage for the first time all day, easily handling the smaller Commodores defensive front. Score Renegade 7- Commodores 14.
This would prove to be the spark that both teams needed as the game began to quickly change. The ensuing kickoff was returned to midfield where the Commodores took over on Offence. After the successful drive by the Renegade it would be the Commodores turn to place together a drive that would get them to first and goal.
This teams Offence wouldn't be able to produce the same success running the ball at the goal line that it had in the open field. Quickness gave way to strength and brawn.

Commodore Running back Ryan Koske was provided with great edge blocking all day, but couldn't produce the same success up the middle when it counted.
After unsuccessfully being able to run the ball at the goal line, the Commodores' passing game needed to come up big and it did on a broken play a tipped pass by the Defense found itself in the hands of Eric Olson for a touchdown, in very dramatic fashion with a 14 point lead again and time running out.
Score Commodores 21- Renegade 7.
The next two drives by each team saw scores including a forth and goal conversion by the Commodores to again go up by 14. A pass from Ken Koske to Eric Olson. Score Commodores 28 - Renegade 14.
With just 10 minutes to go in the game a 30 second play clock was instituted and the Renegade once again began to drive getting into Commodore territory, then seeing the drive end because of a failed fourth down conversion.
A stop on defense however could get the Renegade back in the ball game, they needed a big play, something that hadn't happened all day for them; and they got one, an interception by Keith Baker for the Defense was returned for a touchdown. Score Renegade 21 - Commodores 28.
An onside kick was inevitable and everyone knew it but the Commodores couldn't seem to get organized on Special Teams. The kick hadn't traveled ten yards yet when Eric Olsen for the Commodores jumped ahead of the play and touched the ball, after a scramble for the lose ball a Renegade player picked up the ball giving his team a chance to get another score to try and tie up the game.
With three minuets left in the game on a running clock, the Renegade struggled to get a first down, then on fourth down they got a play from Osterkamp their QB and a first down. After another penalty and an automatic first down the ball was advanced down to the five yard line. With inside a minuet left one the clock three incomplete passes resulted in a fourth down for the Renegade who now had just one final chance to reach a tie. It would be the last play of regulation in the ballgame either way but some confusion and the inability to get the ball snapped just before zero's on the clock showed. The game ended giving the Commadores a victory and bragging rights till next year. A perfect start to a perfect day and the beginning of a new American Tradition. Happy Thanksgiving and Merry Christmas!!
K.D. Queen
Wednesday, November 27, 2013
Tablet Tip: Improve Your Workflow

Happy Thanksgiving! We're all very busy right now with the holidays upon us, and then add work and keeping up with clients, something has to be sacrificed and in the end it'll be time. So today I thought I would share a quick tip that Will help improve your work flow.
If you own a Wacom Tablet such as the Intuos 5 like I do then you already know how much of a life saver it is. But did you know to speed up your work flow even more tilt the tablet on about a 45 degree angle. Artist do this all the time because it's the natural way to draw and write.
I use a photo album and place the Intuos 5 right on the edge so it is balanced as seen in the image below. Whether using Manga Studio 5 or PS/LR5 this setup works well in all situations. And I know it'll help you too.

Don't worry if this setup feels unnatural at first it will take no time to get use to the change, just make sure your comfortable.
If you like this tip and look forward to more like it please subscribe.
Tuesday, November 26, 2013
Logo's Too
Digital Drawing Made Easy With Mango Studio 5.0

Pair of Wolf Eyes for a High School Mascot
I was able to draw this image using Manga Studio 5 and my Wacom Tablet, not Photoshop. Why? Manga Studio was designed with the digital artist in mind, and is the premier tool used by comic book artists around the globe. The work flow is smooth, the interface is user friendly. The ability to design and draw in either raster or vector layers with lightning speed is absolutely top notch. I give it two thumbs up.
Tuesday, November 19, 2013
Use Zoom to Tell the Story
This image was taken toward the end of the game during a foul shot attempt. Notice each player and coach scooted to the edge of thier seats, the game was close and just seconds remained. This allowed me to capture the image I needed.
About halfway through the game I noticed the colorful choice of footwear, so I knew I wanted this particular shot but I had to have the right moment to capture the image. Patience along with thinking ahead helped me to capture the moment. I had positioned myself at the end of the team bench, and just before the free throw was attempted I edged out on the court and pressed the shutter button.
Notice the footwear choices by the opposing team in the distance of the image, even that simple comparison adds to the power of presence. Increases the interest and adds an element of depth to the story in this image.
 A telephoto zoom lens was used to capture the shoes, compressing the detail over a distance of fifty feet or so, this same story and information could have never been gathered or told with a wide angle lens.
About halfway through the game I noticed the colorful choice of footwear, so I knew I wanted this particular shot but I had to have the right moment to capture the image. Patience along with thinking ahead helped me to capture the moment. I had positioned myself at the end of the team bench, and just before the free throw was attempted I edged out on the court and pressed the shutter button.
Notice the footwear choices by the opposing team in the distance of the image, even that simple comparison adds to the power of presence. Increases the interest and adds an element of depth to the story in this image.
Sunday, November 10, 2013
After Shot Pro product Review
Shorter than I thought...
The first thing that I have to say about this After Shot Pro review that I promised, that it'll be a very short review. Much shorter than I had anticipated from the start. You'll understand why...
Initially I was drawn to AfterShot Pro because of the noticeably low price cut of $29.99 u.s. Since this offer is only good till 13 November I decided to jump on the free download and try it out before I decided to buy.
I had been interested in a camera RAW editing software that would allow me to have full control over my image when I shot in RAW. Canon users already know about the free program that comes with any Canon purchase, Digital Photo Professional as it's called. I currently use that tool but wanted to see about an upgrade for my RAW workspace rather that having to toat around PS or any other large program. So when I noticed the drop in price, my curiosity was peaked.
While AfterShot Pro is a stand alone product engineered by Corel the makers of many other design software programs it does also offer its own plugins, it is designed to be a first step in the photo editing process. At the full price of $100 u.s. I would find it hard to justify the purchase especially when the complete version of LR5 can be paid in full for $50 u.s. more. But with the 70% temporary markdown it's worth taking a look inside.
First Impressions...
The non-destructive editing really opened my aperture and I like this idea, why everyone doesn't do this I don't know as it seems really a no brainer. Right away the speed at which the program imports and exports images is amazing, not just single images but multiple images and whole files of images. First impressions are looking good.I'll add at this point that the program has a steep learning curve but I'll talk more about this later on. If you are looking for an easy way out then this won't be the program for you so you can save your eyes and stop reading now.
However, for the rest of us who are interested in the capability's of this program and it's features, I'm right here to tell you that it's pack with a bunch of em'. Okay so that ain't good English but I'm excited, cain't hardly keep my finger off of the shutter button! You have full control over exposure levels and tint all the buttons you've come to expect and where the detail really comes out is in some of the finesse ability's of the sliders. Take the chromatic aberrations bar it allows you to adjust between four different colors, Red/Cyan & Blue/Yellow, most of the tools available have multiple adjustment options like these.
Where ASPro really shows its strength over the competition happens to be the layout of the menus, options and tool. There are tabs and menu's on all four sides of the workspace and all of the tool tabs much like LR have there own collapsible and pinable bars such as the Histogram and Basic Adjustments to the Curves tool and Lens Correction tools. All of these tools are very easy to work with and the work flow at this point is very fast paced and I found that it didn't take anytime at all to feel very comfortable, for awhile I almost thought I knew what I was doing.
Before I start tearing this program apart, which I wanted to do more than once, I thought to mention that there is a nice double click feature to reset my sliders just like LR and also I liked the fact that the Lens Correction Menu was as extensive as I've seen in any program thus far. I found some of my lenes that are many years old and go back to the film days. The list just keeps going on and on. Kudos points there.
As I mentioned I really found myself beginning to get frustrated with the program only when I wanted to work with a few tools, such as the curves tool, any adjustment made with ASPro however minor a move you think you are making will have huge effects within the image. So if you're use to certain setting with most of the other software programs, you have to scrap those go-to-numbers and settings that you may be already use too.
Another problem mouse users will face is the sudden and constant change in you image and for no apparent reason. I was having this issue then when I would go through my sliders I noticed that some of the setting where changing. No the program doesn't have ghosts and ghouls, even though I swore that it did at one point. Upon further investigation I found that the movement of my mouse wheel was causing my sliders to change even when I was not directly over them. This quickly became annoying, but with my Wacom tablet I had no problems, its just for those mouse users that this will be an extra workaround, one that shouldn't be found in today's computer programs. It just reminded me of trying to use a computer in the 90's, sometimes.
There where a couple of other issues that I became frustrated with during the import and export phase, while the speed was blistering and amazingly fast getting the settings I wanted proved to be troublesome. This no doubt relates to the steep learning curve I was referring to earlier and will come with time.
Pros
Non-destructive editing software is a HUGE plus for me
Like the $30 discount price tag
Lots of tools in easy to reach placesFast Import and Export Speeds
Quality fine tuning availability within the tools
Can work in layers, much different that PS layers, but still layers
Plugins
Presets available to use and create
Lens Correction options
Easy to navigate, may be due to my LR5 experience
Solid fundamental program built on a quality foundation which has been around for years and it shows
Steep learning curve
Cons
Steep learning curve
Can be frustrating at times during the import and exporting process, this is in no doubt due to the steep learning curve and will come with time but I feel that these area's should be the easiest and most guided, it's what we all will use no matter what
Healing & Cloning tools aren't very good at all
Tone Curves are too sensitive
Quality of export seemed to be reduced in final image, this increased the frustration
Using a mouse takes a little more care and precision, reduces the work flow pace
Lasting Impressions...
I knew coming into this that I'd have a steep learning curve, the program is designed that way and in all fairness I knew I wouldn't be able to grasp fully what was really going on until later, and I must say it will be much later. But this really did provide for a true crash course experience and a great way to write a blind critique.There are lots of good features and even some great ones, I found myself frustrated at times when I knew I shouldn't be. There are just some things that do not make sense and would have been far better off leaving out of the program all together, like the healing and cloning tools.
I'm amazed at how many features are in this program for $30 and that sounds like a bargain. I'm always looking for a good deal. Still yet I just don't know if I'd rather put that money toward something a little more in price, instead of dealing with some of the quirks. Still it's only $30 and that's better than nothing, I'll definitely have more control over my image, but I can't say the same about my temper...
Keep in mind that my final score takes into account this is only a Camera RAW software tool.
Final Score 7.5 out of 10
There scores:
PC Mag.com - 2.5 out of 5, Fair product
Softpedia - 4/5 with 4,292 downloads
Telecharger - 9 out of 10
Digital Camera Review - 4.5 out of 5
Thursday, November 7, 2013
corel AfterShot Pro BIG HUGE Discount
Get It for $29.99 U.S. dollars
AfterShot is a camera Raw photo software tool and I'm letting everyone know that this discount will last till Nov 13th. Which is 70% off of the full price.
You can also download a free trial and try it first. I will have a review out through the end of this weekend.
Monday, November 4, 2013
Better Flash Photography
Simplify the

...and Learn to Take More Consistent Photographs
I don't know how much the Inverse square Law comes up in the everyday Photographers conversations, but I hear Professionals talk about it and even though many pros understand what the law means to them and the way they take photo's; it still seems to bug down there own ability to explain what the purpose of this law does and how it translates to us the everyday photo guy's and doll's.
I'm going to attempt to simplify this for all of us, Pro and non-pro alike. Most of us just want to be able to create simple images with good results with little need to think about things like aperture, ISO and Shutter speed, then add in a flash and Ugggh....
"Wait can you make another wish grandpa I need you to blow out the candles again because I didn't..."
I didn't, those words haunt many a photographers, all because of that evil 'f'' word.
FLASH
Let's make it simple, below are a couple of charts that I created to help me keep a more consistent image and I decided to share them with you in a .Jpeg format that can be easily downloaded.
Anyone who understands the Inverse Square Law is going to find my simplified thought quite annoying. But it may help you to explain the Law to someone else.
Here are two definitions...
Science—when a light source is moved further from a subject, or a subject from its light source its intensity reduces by the square of its inverse. Meaning the amount of light on a subject will be the square of its inverse of 22.
Simple—Light falloff is relevant to Light distance.
This first chart is a quick reference guide I have memorize. It makes understanding the science on a little bit simpler terms; BUT ITS STILL BORING, so if you don't want boring skip ahead to the next section now, unless you are looking for a good nap, and this should be where you keep reading on.
Just about anyone can tell the difference between two, four, eight feet and so on. Using this simple diagram has helped me to understand and quickly reference how to set up my flash to change the shadow effects of the image. It helps to avoid the ratio battle and confusion that comes from using flash and multiple flashes.

Let's suppose I place my flash on any power level I want to and place it 2' from my subject, well we all know that it is going to be very harsh and quite unpleasant to look at in most cases: so I move it back to 4', now the same flash on the same power level with twice the distance only about 25% or 1/4 of the light will reach my subject, lets move it back even further to 8', now the same flash has only 1/16 of the light or about 6.25% of the light will fall across my subject, and even further to 16', now that's a mear 1/64 or 1.5% of the light that I had at the original 2' distance where I started.
Using this method, which is the Inverse Square Law, any distance can be plugged in: feet, inches, yards meters, whatever your comfortable with or whatever the situation you find yourself in this will remain constant. Something so simple as moving the flash distance can change the effect of shadows in your image. Foreground or Background.
Just about anyone can tell the difference between two, four, eight feet and so on. Using this simple diagram has helped me to understand and quickly reference how to set up my flash to change the shadow effects of the image. It helps to avoid the ratio battle and confusion that comes from using flash and multiple flashes.

Using this method, which is the Inverse Square Law, any distance can be plugged in: feet, inches, yards meters, whatever your comfortable with or whatever the situation you find yourself in this will remain constant. Something so simple as moving the flash distance can change the effect of shadows in your image. Foreground or Background.
The Easier Setup...
What I've done with this chart, based on Speedlight's (or speedlite if your a Canon photographer) manual settings I've developed a very simple chart for what Power setting to put my flash on based on how far I am from my subject.
Camera is set at ISO 100 or 200 and shutter speed is set at 100 or 125th on shutter priority mode this lets the camera adjust the aperture. It's a great starting point and its based on doubling the distance. Helps to avoid chimping (looking at the histogram and LCD screen after every photo capture) and is much quicker than those methods.

I do recommend that a light meter be used when possible, but that's not always the case when we don't have our gear or photographing something like Christmas, birthdays and family reunions and other holidays and such.
My recent self portrait was done on 1/32 power at about hands distance away and in a lit room, this image acutally ended up being my last one, once I got the shot then I was done then I did what I wanted to well actually I spent more time writting my blog...
Keep shooting and as always Happy Shooting!
Wednesday, October 30, 2013
Getting that Digital IR Look
Save that Image?
Don't hit DELETE just yet, TRY this out first
Today I'll attempt to save one image that normally would have been deleted, and I'll take another image to a entirely different level. How? By giving each image an IR look without the use of expensive film or equipment. I'll be using Tone Curves strait out of the camera, skipping Lightroom & Photoshop all together, save time: I'll be on my way.
I use this for an image that I either don't like or really like, mainly landscape images and almost entirely outdoors. The sun needs to be bright so that it blows out the highlights. An inferred filter can be quite costly, and removing the IR filter on your digital camera will cost about $200us.
I've chosen two photo's a Color image and a B&W. Let's look at the B&W first.
The Running Nun (that was not intended to be a play on words)
This image was photographed in B&W with a custom WB. It's important when attempting to do this that a custom WB is used, but not necessary. To get a custom WB you need to point your camera at the ground, with the sun shining, preferably on grass and with the sun shining.
Now that I've set my custom WB, I just went ahead and took the image like normal, sometimes if I'm going to create an IR image then I will purposely over expose the image. Here's the before and after image.


Well I'm not going to win any awards, this certainly isn't going to bring me any cash either. I didn't even choose to display this image in my Google+ Albums. That is an entirely different edit, and quite a better one too! Check that out here Cross Process Nun It's fun and gives the image an interesting and contrasty look and feel, it impresses friends and family and after a while I end up keeping several images that otherwise just wouldn't cut it.
Here's how I did it... Tone Curves


Normally I tend to put a slight S curve into my Luminance Curve, however her I placed one dot in the middle as an anchor point, turns out I didn't even need it. In the Red curve I did however add a little to the highlights in the B&W image. And I used the green to pull a little out of the highlights and increase in the shadows. Notice in the Blue Curve how it just begins to start clipping, I've found that either the blue or red curve will just begin to clip but I keep it backed off from this point, however I do not want both to reach that point in the image.


Now let's take a look at the colored image conversion...
Here's the before and after


The thing that really bugs me about this image is the overcast sky, winter's in Iowa... I'd preferred to have had a really contrasty sky but I don't want to pass up those fall colors. I really like the interesting sky in the first photo.
Here's a Tip: try shooting with a high ISO 400-800 to add texture to the image!
Here are the four tone curves, split up like in the first image, notice how the red and blue just about stay the same it's the green curve that changed but notice how I changed it I took it in one arking loop, soft and gradual. Make sure you write down the slider setting also, 3 out of the 4 had tweaks made to them.


Keep shooting and good luck!
Here are some more images that I played with.

Original B&W high ISO

Original Color

Original B&W scanned from film
Monday, October 28, 2013
Outdoor Lighting Tip
Shooting into the Sun can be Fun
This past Saturday I had the opportunity to do some street shooting, albeit a different kind. So I took up the challenge packed light and headed downtown for the Newbo Chicken Run a 5K costume race.
The Gear
Since I knew I'd be walking a lot, I needed to take minimal gear so I choose my camera, two lenses a 28mm f/2.8 and the 18-55 which I didn't use. I also had my Speedlite and 3ft. sync cord, with a gel on the flash. The gear I choose was dictated by the shot that I wanted to get.
I knew already that I wanted to shoot into the sun. There were several factors that led to this decision, the time of day for one; it was around 4 o'clock p.m., so I knew that the sun would still be a bit harsh yet, I had it right where I wanted it.
The Problem/Solution
I obtained a course map and then printed a more detailed map from Google marked with Landmarks and other interesting areas of the route that I felt would provide me with interesting background material or image subject matter. I took both of those marked up maps with me but not before I had picked a couple of spots to photograph from forehand. In a short 5 kilometer race like this one I would only have one or two locations to photograph the runners. Determining that I wanted a shot into the sun helped to eliminate areas that I didn't want. Next I had to choose between area's of the race course that where close together and Landmarks that I wanted.
A race like this with so many persons and all dressed in costumes excited me, I knew that I didn't know what I'd be getting, even more so I liked the fact that it all wouldn't be the same. However that also increased my opportunity to miss the shot, with so many different characters who knew what I'd be getting and how long would I have to wait in one position before I could move to the next?
Here's The Shot_ One of Em'
You can find more from the album on Google plus here Chicken Run Photo's
 Image 1
same as last Image 5 but with flash turned on blue gel removed from the flash
How I made the Image
First things First
I not only wanted to photograph into the sun I also wanted images that looked discolored, but I wanted to do this in camera not afterwards. I wouldn't be shooting in RAW and I would be using medium Jpeg files because these images were just for fun and wouldn't be leaving the web.
Beside all that I have been experimenting with in camera ways to create digital Lomo and XProcessed or Polaroid type images. At lease things similar.
WB +/- Shift Bracketing
In Canon camera I used a custom WB setting which I had preset the day before, adjusting this from a sepia photo which had the WB off because I photographed an image using the "wrong" or incorrect WB. Then in the menu setting WB +/- Shift Bracketing I moved the correction settings around to give me a more blue and magenta color. All this was saved and shot from one of the camera's presets menu.
Flash n'things
The in camera settings gave me the images I've posted below; I covered my flash with a blue gel, it turned out to be to much blue so I decreased my flash to 1/4 power and that helped but then for a different effect I changed the custom bracketing back to normal, then I ended up taking the blue gel off the flash entirely. With each new location I went to the setting change so my camera settings changed also, for the image above I incresed the flash power to full. I knew how entirly important it would be to use as much flash power as I could get shooting into the sun.
 Image 2
test shot, bluish setting withing the camera
 Image 3
adjusted image with blue gel on flash at 1/4 power
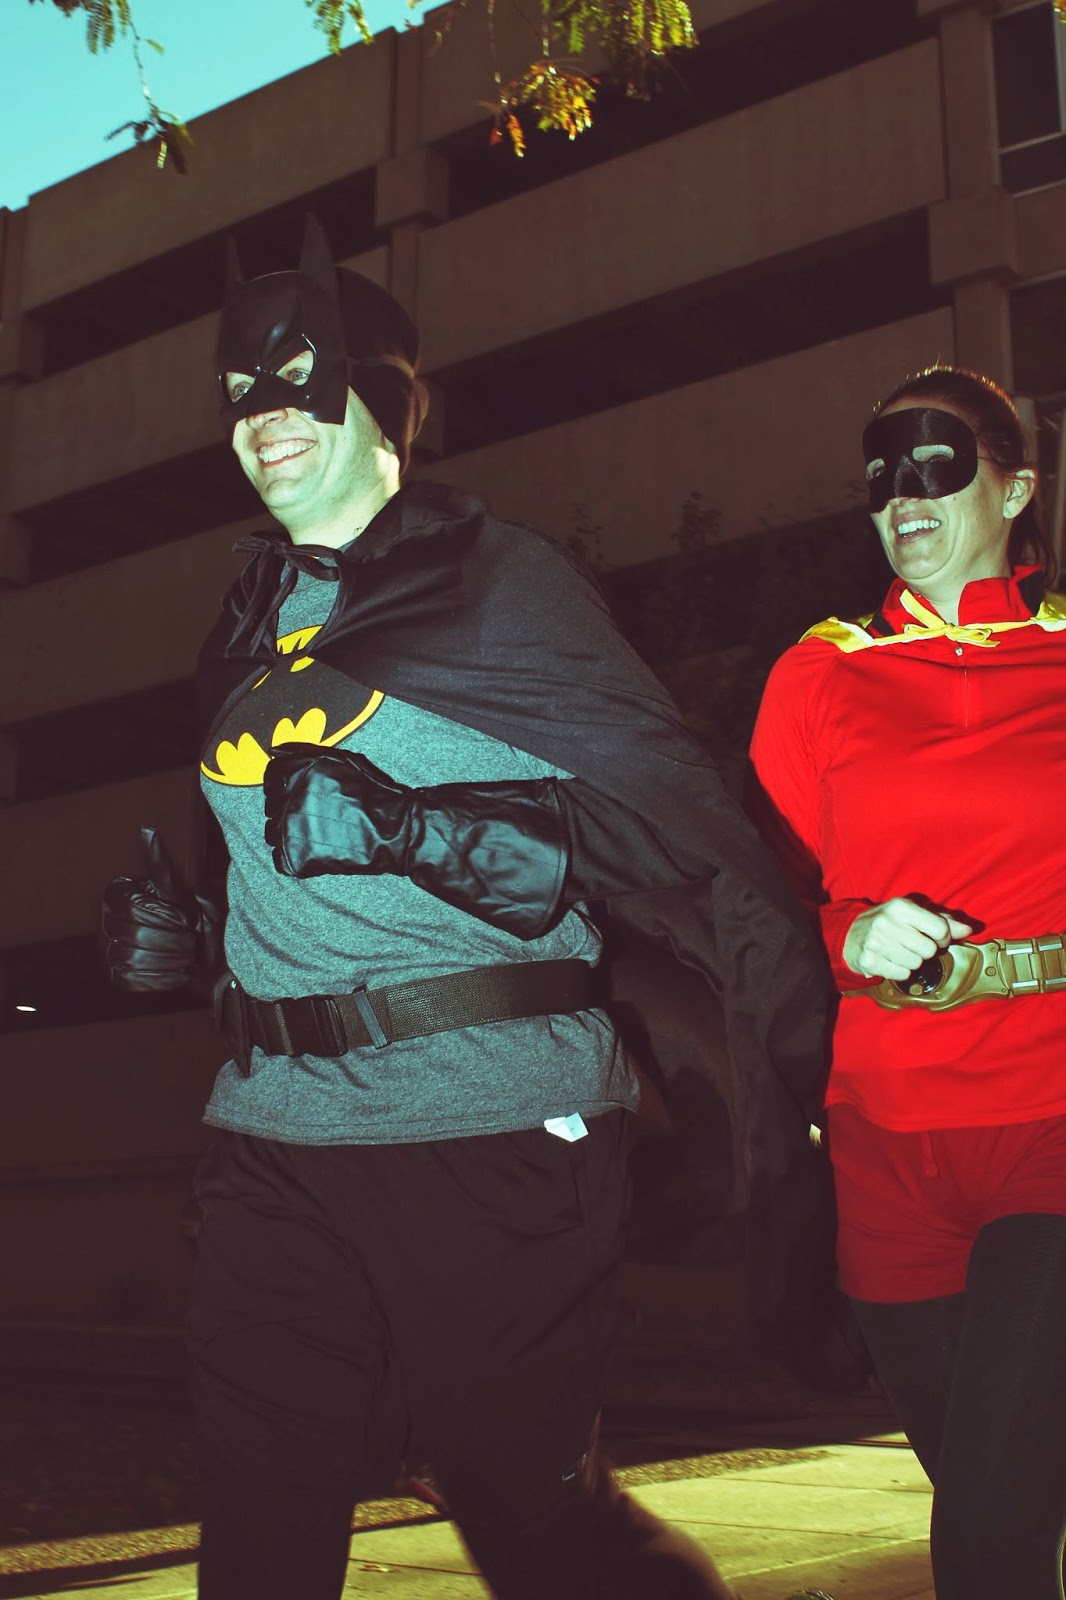 Image 4
custom bracketing off, custom WB on with "incorrect" WB and blue gell still on flash
 Image 5
No flash, as you can see from this image here flash is very important when facing the sun
So why bother, when there is photo shop, etc...
I've learned to live by those words of Frank Doorhof "why fake it when you can create it?" My chooise to create in camera permited me to save so much time. The only adjustment was made to the tone curves as I downloaded the images. No need to spend the time in photoshop or lightroom, the images where up on the web shortly after I finshed capturing them.
Learn to use your equiptment better, you'll be a better photographer with the confidence to boot. There is nothing worse than as a photographer finding myself in a situation where I don't know what to do, I find that the more I try different things the more confidence I have down the road in those tight situations.
Learn to use your equiptment better, you'll be a better photographer with the confidence to boot. There is nothing worse than as a photographer finding myself in a situation where I don't know what to do, I find that the more I try different things the more confidence I have down the road in those tight situations.
Wednesday, October 23, 2013
Shoot the Snoot, Advanced Techniques
Diffused, White, Black and Confused?
Just because we have the gear and spent our valuable dollars on it, doesn't mean we'll get the shot let alone know what to do with it.
In this Post I talk about how to use a snoot and look at the few albeit simple differences the slightest changes can make.
The first three images below produce dramatically different results, leaving the camera settings the same, the distance from the light source doesn't change either (about 5' from the end of the snoot). As with all the images from this post the only change was the way I used my snoot. And I'm about to share them with you.
The Top image has been made with a white snoot, typical results nothing to fancy, sure can tell they are fake silk flowers. I choose flowers for this example because of the many colors and edges in the image lots of contrasted areas between the highlights and shadows.
For the Middle image I used a diffused snoot. No, I've not placed a diffuser between the flash and the subject material, what is it then?
I've made a snoot out of diffuser material, some of the light travels through the snoot but most of it gets diffused through the sides of the snoot and now become a little late and softer getting there, now I've begun to produce a more interesting look.
 Top
Top
Remember you're not putting a diffuser over the flash or between the snoot and the subject, the end of the snoot stays open just as if you are using it normally.
 Middle
Now for a more extreme quality to my image. I've used a fully black snoot.
Take the Rogue Flashbender for example, its white on one side and black on the other, try using the black side for the inside of the snoot. It produces more contrasty image quality. Now I've got a much more interesting image, even for fake silk flowers, this end result is dramatic and fun. I've still got one more tip so keep reading.
 Lower
LowerDifference Between the Black and White snoot, zoomed slightly out.
A snoot is just a easier and much cheaper way to create a spotlight drama that you can get from stage lights and barn doors, it will be a great way to take photo's of the kiddos during halloween, and it doesn't have to be night out side either these where taken at about 2 o'clock in the afternoon right next to a window.
 Black
Black White
WhiteOne last Tip for the Snoot Shoot!

Keep practicing and Happy Shooting. I look forward to seeing some of the interesting images you can create, feel free to share your results and post them in the comments below.
Monday, October 21, 2013
Turn Your Screen Into A Beauty Dish
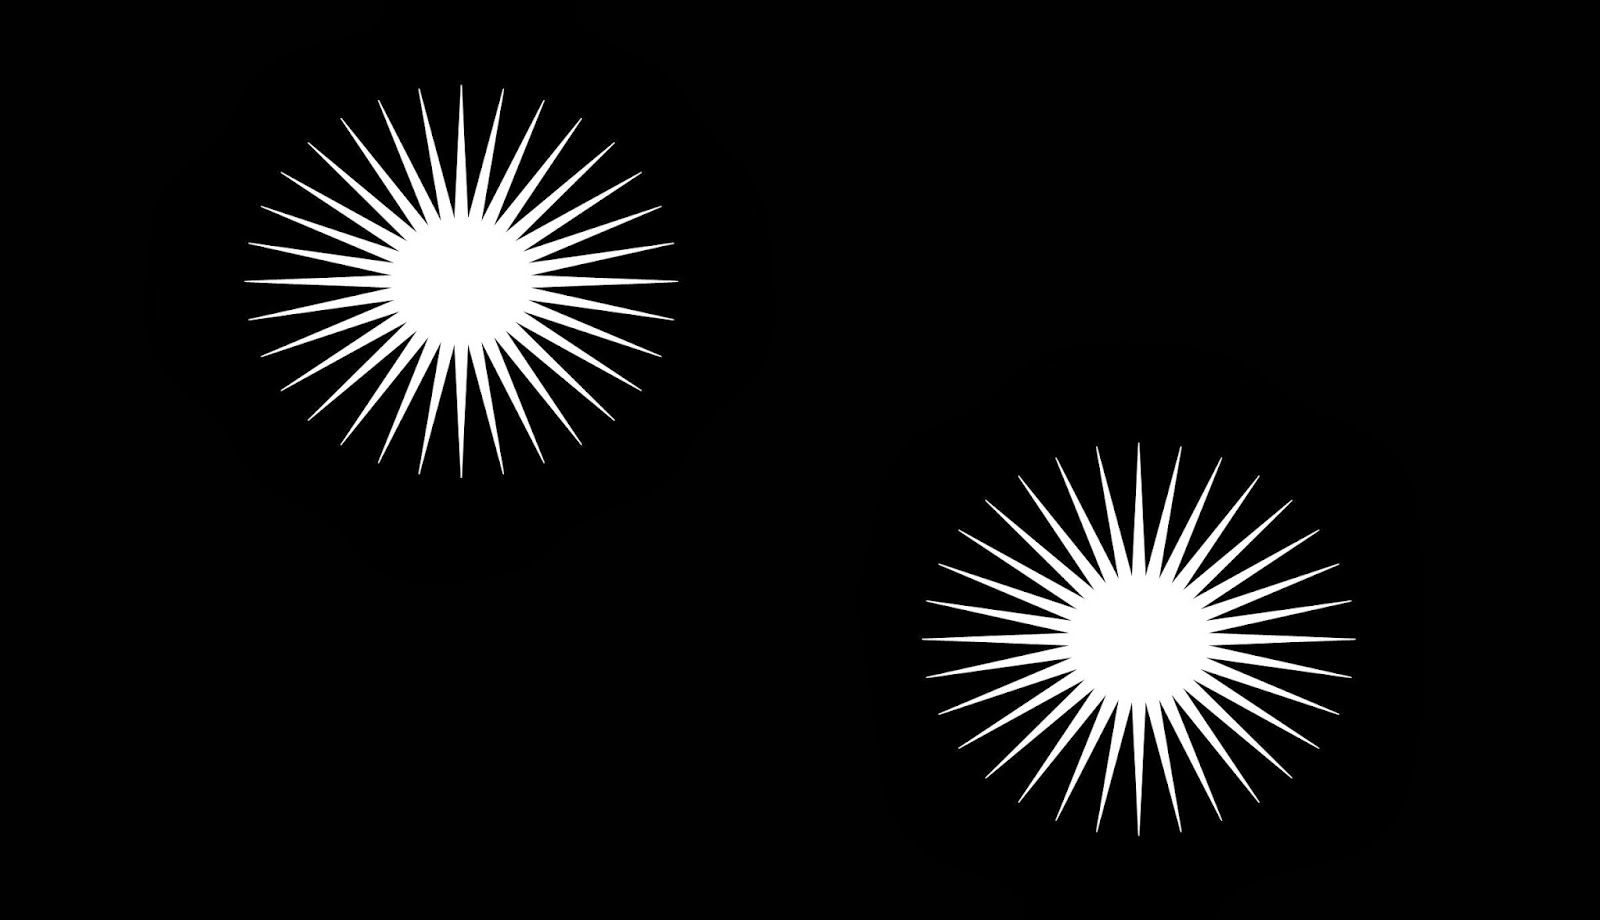
Below I've posted nine panels as .jpg images that can be used to display as a light source directly from a computer monitor or screen in a 16:9 Ratio. It's possible to create different shapes in the eye's of the subject your photographing.


Also if you haven't check this out yet here is the link below!
Free till Oct. 31st DxO Film Pack 3
To download just click on the image and save as...
For easy use just place in a folder and open full screen using the arrow keys to move between images.
Tips on Using a Screen display as your Lighting Source:
1. Make sure you turn up the Backlight to full power.
2. Place the display on a cool white, this maximises your lighting strength.
3. Keep in mind there will be a quick falloff from this type of power source onto the subject your lighting, so you will need to have your subject's face close to the display.
4. Because of the type of light make sure the makeup is intense(includes fingernail polish eye shadow, lipstick), and the rest of the face is covered very well as this sort of light can be very harsh on the skin depending on your Backlight type, i.e., fluorescent, LED...
5. Turn the display on it's end, (I use a 32" INSIGNIA HDTV and turn upright to light the entire head and shoulders evenly)
6. Use a small piece of white foam core as a reflector next to the screen, like a V-flat.
7. Finally, any ambient light will overpower the light which comes from your screen, keep that off or to a minimum, this includes flash it can disrupt the pattern in the eyes.


Have fun and be Creative! Share with us your results, post them here and as always Happy Shooting!
Also if you haven't check this out yet here is the link below!
Free till Oct. 31st DxO Film Pack 3
Subscribe to:
Comments (Atom)